개요
사내에서 로컬 환경에서 docker-desktop을 통해 docker-compose 기반으로 mariadb, elasticsearch를 띄운 후 애플리케이션을 실행하는 방식으로 개발 환경을 구성해 왔습니다.
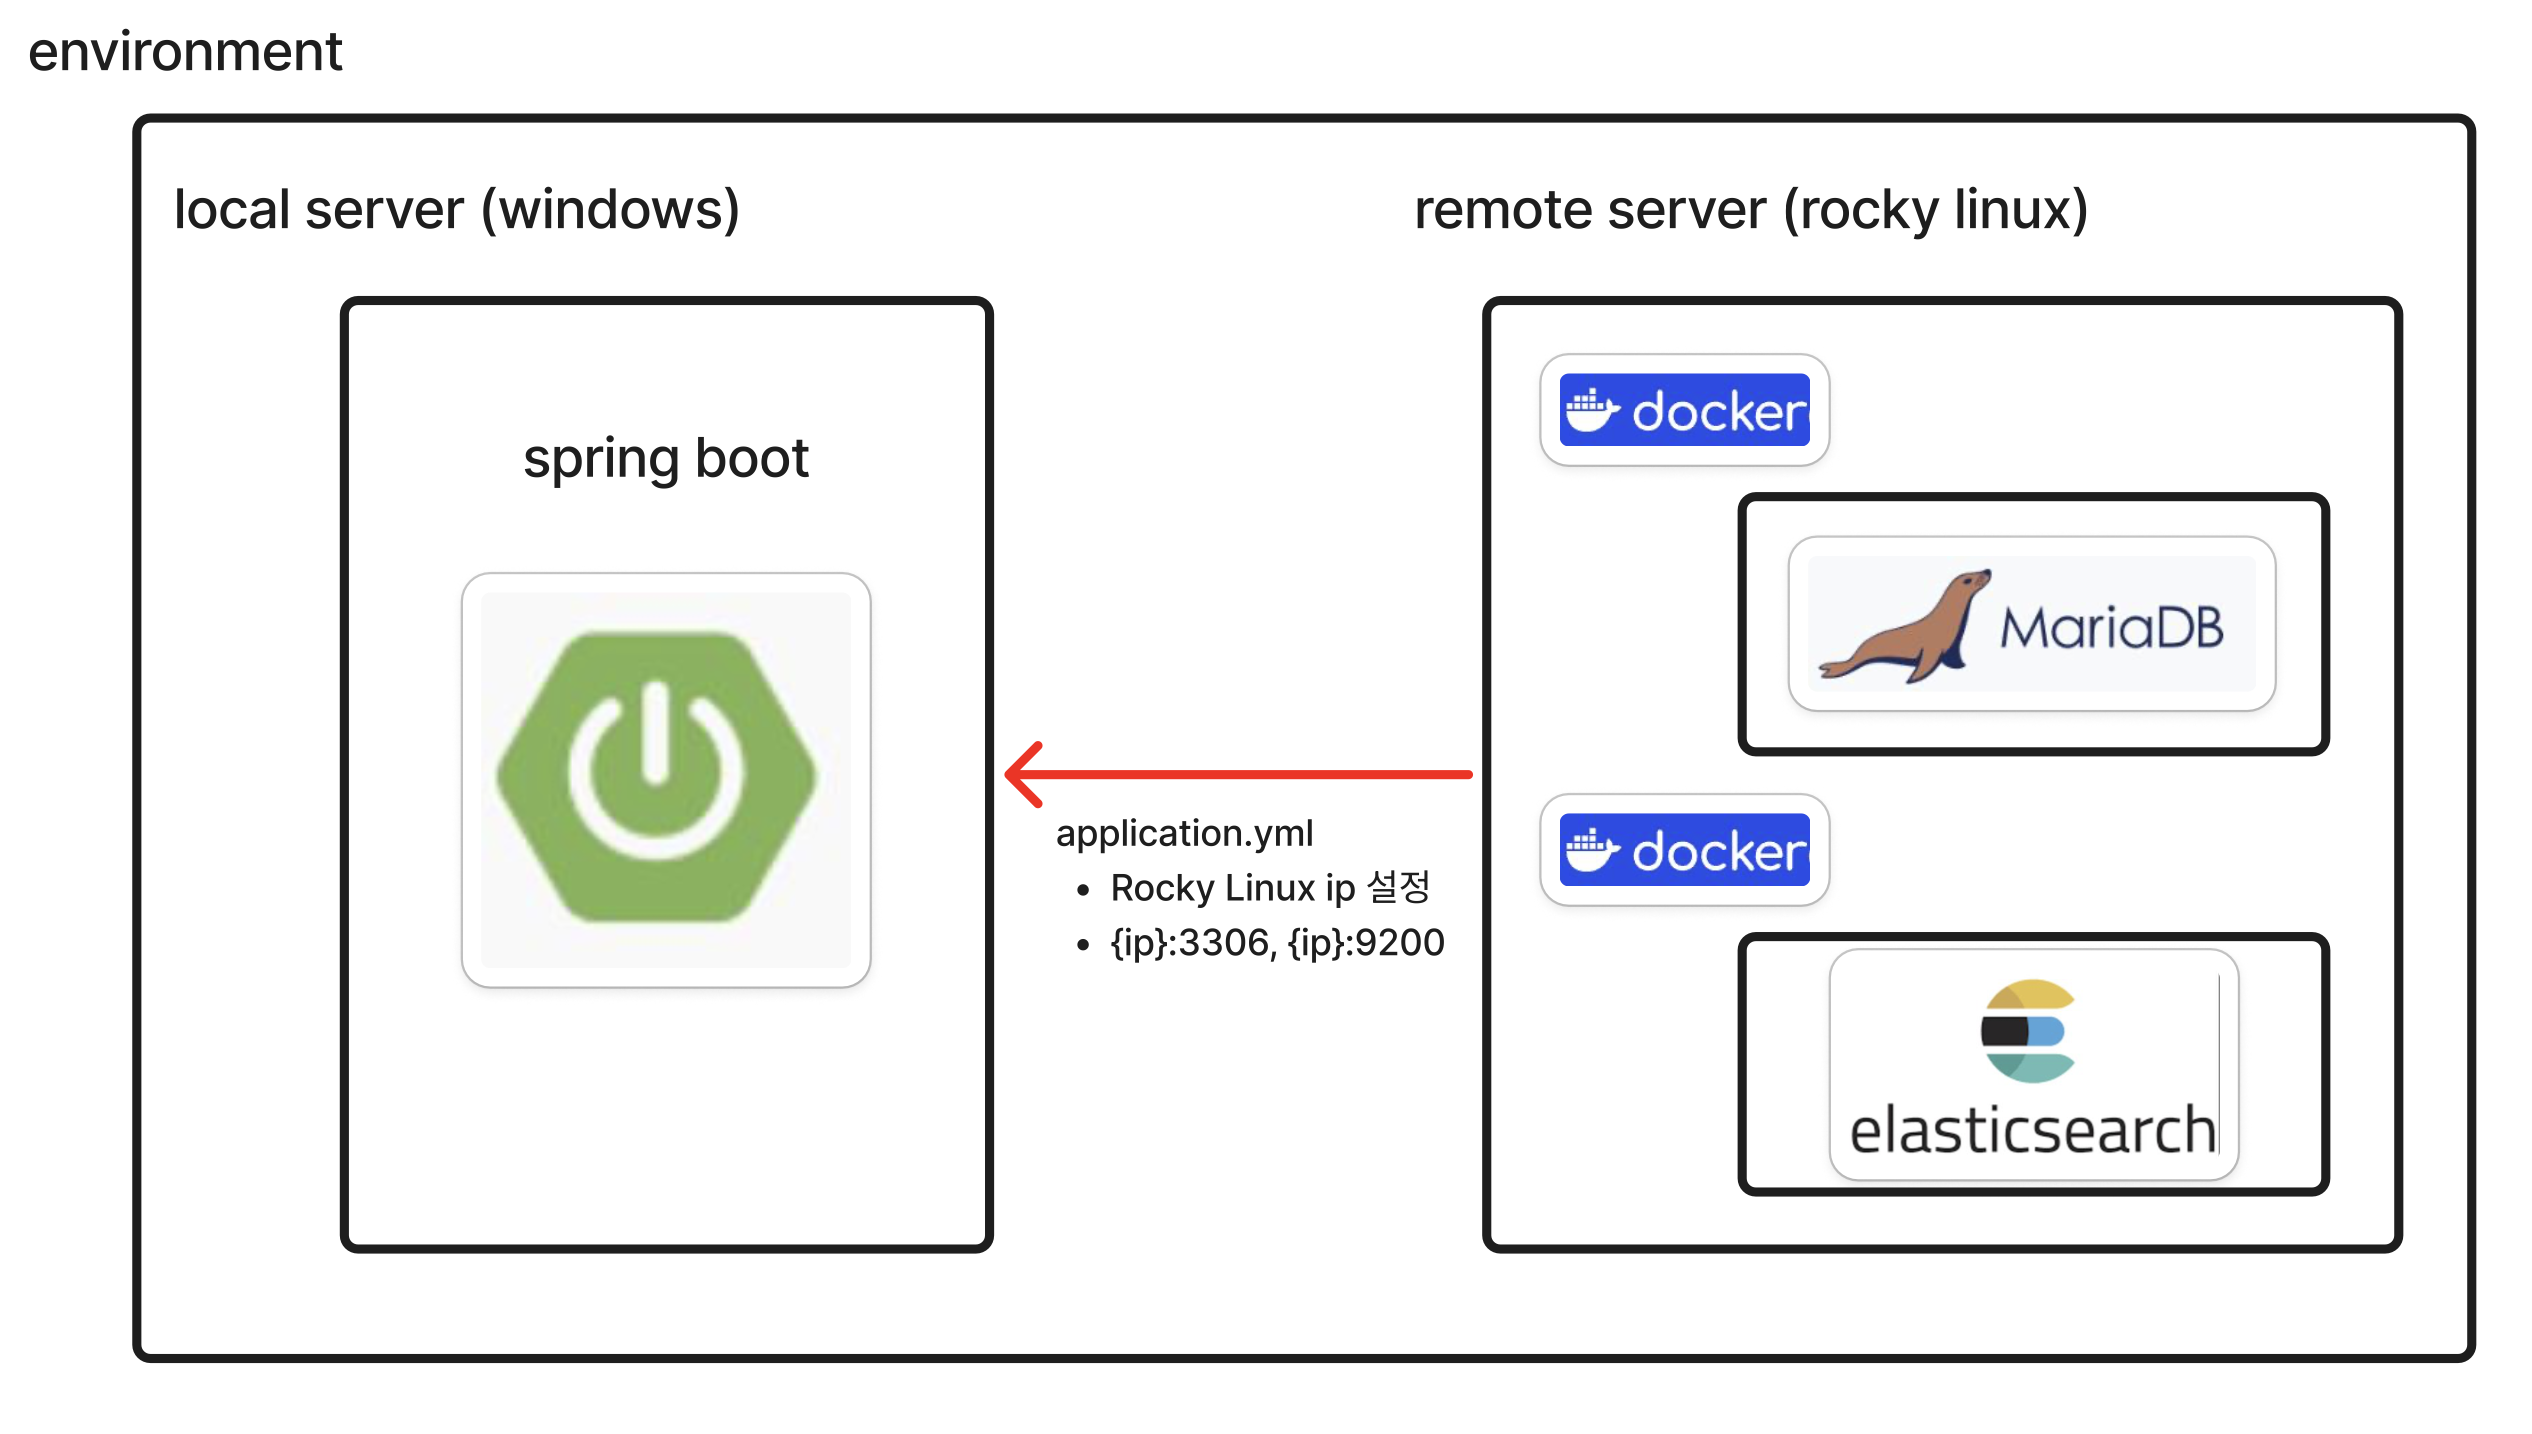
하지만, Docker Desktop은 로컬 메모리를 많이 차지하고, WSL2와 Docker를 조합하는 방식도 큰 차이가 없다고 판단하여 별도의 Rocky Linux 서버에 Docker 환경을 구축했습니다.
이번 포스팅에서는 Rocky Linux 서버에서 Docker 환경을 구축하는 과정을 상세히 다루고자 합니다. 또한, 단순 설치 과정뿐만 아니라, 외부에서 Web Application과 안전하게 상호작용할 수 있도록 방화벽 설정에 대해서도 함께 설명드리겠습니다. 리눅스 배포판에서는 inbound 트래픽을 전부 차단하도록 방화벽이 설정되어 있기에, 필요한 포트만 명시적으로 열어주어야 외부에서 정상적으로 통신할 수 있습니다.
아키텍처는 다음과 같습니다.
Architecture
Rocky Linux 9.2에서 Docker 환경 구축 과정
OS 확인
[root@sb ~]# cat /etc/os-release
NAME="Rocky Linux"
VERSION="9.2 (Blue Onyx)"
ID="rocky"
ID_LIKE="rhel centos fedora"
VERSION_ID="9.2"
PLATFORM_ID="platform:el9"
PRETTY_NAME="Rocky Linux 9.2 (Blue Onyx)"
ANSI_COLOR="0;32"
LOGO="fedora-logo-icon"
CPE_NAME="cpe:/o:rocky:rocky:9::baseos"
HOME_URL="https://rockylinux.org/"
BUG_REPORT_URL="https://bugs.rockylinux.org/"
SUPPORT_END="2032-05-31"
ROCKY_SUPPORT_PRODUCT="Rocky-Linux-9"
ROCKY_SUPPORT_PRODUCT_VERSION="9.2"
REDHAT_SUPPORT_PRODUCT="Rocky Linux"
REDHAT_SUPPORT_PRODUCT_VERSION="9.2"
Docker Repository 구축
- sudo dnf -y install dnf-plugins-core
- sudo dnf config-manager --add-repo https://download.docker.com/linux/centos/docker-ce.repo
[root@sb ~]# sudo dnf -y install dnf-plugins-core
Last metadata expiration check: 3:52:39 ago on Tue Sep  2 01:48:50 2025.
Package dnf-plugins-core-4.3.0-5.el9_2.noarch is already installed.
Dependencies resolved.
====================================================================================================================================================================
 Package                                            Architecture                     Version                                 Repository                        Size
====================================================================================================================================================================
Upgrading:
 dnf-plugins-core                                   noarch                           4.3.0-20.el9                            baseos                            36 k
 python3-dnf-plugins-core                           noarch                           4.3.0-20.el9                            baseos                           246 k
 yum-utils                                          noarch                           4.3.0-20.el9                            baseos                            35 k

Transaction Summary
====================================================================================================================================================================
Upgrade  3 Packages

Total download size: 317 k
Downloading Packages:
(1/3): yum-utils-4.3.0-20.el9.noarch.rpm                                                                                            117 kB/s |  35 kB     00:00
(2/3): dnf-plugins-core-4.3.0-20.el9.noarch.rpm                                                                                     106 kB/s |  36 kB     00:00
(3/3): python3-dnf-plugins-core-4.3.0-20.el9.noarch.rpm                                                                             696 kB/s | 246 kB     00:00
--------------------------------------------------------------------------------------------------------------------------------------------------------------------
Total                                                                                                                               348 kB/s | 317 kB     00:00
Running transaction check
Transaction check succeeded.
Running transaction test
Transaction test succeeded.
Running transaction
  Preparing        :                                                                                                                                            1/1
  Upgrading        : python3-dnf-plugins-core-4.3.0-20.el9.noarch                                                                                               1/6
  Upgrading        : dnf-plugins-core-4.3.0-20.el9.noarch                                                                                                       2/6
  Upgrading        : yum-utils-4.3.0-20.el9.noarch                                                                                                              3/6
  Cleanup          : yum-utils-4.3.0-5.el9_2.noarch                                                                                                             4/6
  Cleanup          : dnf-plugins-core-4.3.0-5.el9_2.noarch                                                                                                      5/6
  Cleanup          : python3-dnf-plugins-core-4.3.0-5.el9_2.noarch                                                                                              6/6
  Running scriptlet: python3-dnf-plugins-core-4.3.0-5.el9_2.noarch                                                                                              6/6
  Verifying        : yum-utils-4.3.0-20.el9.noarch                                                                                                              1/6
  Verifying        : yum-utils-4.3.0-5.el9_2.noarch                                                                                                             2/6
  Verifying        : python3-dnf-plugins-core-4.3.0-20.el9.noarch                                                                                               3/6
  Verifying        : python3-dnf-plugins-core-4.3.0-5.el9_2.noarch                                                                                              4/6
  Verifying        : dnf-plugins-core-4.3.0-20.el9.noarch                                                                                                       5/6
  Verifying        : dnf-plugins-core-4.3.0-5.el9_2.noarch                                                                                                      6/6

Upgraded:
  dnf-plugins-core-4.3.0-20.el9.noarch                  python3-dnf-plugins-core-4.3.0-20.el9.noarch                  yum-utils-4.3.0-20.el9.noarch

Complete!
[root@sb ~]# sudo dnf config-manager --add-repo https://download.docker.com/linux/centos/docker-ce.repo
Adding repo from: https://download.docker.com/linux/centos/docker-ce.repo
Docker Package 설치
[root@sb ~]# sudo dnf install docker-ce docker-ce-cli containerd.io docker-buildx-plugin docker-compose-plugin
Docker CE Stable - x86_64 115 kB/s | 78 kB 00:00
Dependencies resolved.
====================================================================================================================================================================
Package Architecture Version Repository Size
====================================================================================================================================================================
Installing:
containerd.io x86_64 1.7.27-3.1.el9 docker-ce-stable 44 M
docker-buildx-plugin x86_64 0.26.1-1.el9 docker-ce-stable 16 M
docker-ce x86_64 3:28.3.3-1.el9 docker-ce-stable 21 M
docker-ce-cli x86_64 1:28.3.3-1.el9 docker-ce-stable 8.6 M
docker-compose-plugin x86_64 2.39.1-1.el9 docker-ce-stable 15 M
Upgrading:
selinux-policy noarch 38.1.53-5.el9_6 baseos 44 k
selinux-policy-targeted noarch 38.1.53-5.el9_6 baseos 6.5 M
Installing dependencies:
container-selinux noarch 4:2.237.0-1.el9_6 appstream 58 k
fuse-common x86_64 3.10.2-9.el9 baseos 7.3 k
fuse-overlayfs x86_64 1.14-1.el9 appstream 66 k
fuse3 x86_64 3.10.2-9.el9 appstream 53 k
fuse3-libs x86_64 3.10.2-9.el9 appstream 91 k
libslirp x86_64 4.4.0-8.el9 appstream 67 k
slirp4netns x86_64 1.3.2-1.el9 appstream 46 k
Installing weak dependencies:
docker-ce-rootless-extras x86_64 28.3.3-1.el9 docker-ce-stable 3.4 M
Transaction Summary
====================================================================================================================================================================
Install 13 Packages
Upgrade 2 Packages
Total download size: 115 M
Is this ok [y/N]: y
Downloading Packages:
(1/15): docker-ce-28.3.3-1.el9.x86_64.rpm 11 MB/s | 21 MB 00:01
(2/15): docker-buildx-plugin-0.26.1-1.el9.x86_64.rpm 7.7 MB/s | 16 MB 00:02
(3/15): docker-ce-rootless-extras-28.3.3-1.el9.x86_64.rpm 3.2 MB/s | 3.4 MB 00:01
(4/15): docker-ce-cli-28.3.3-1.el9.x86_64.rpm 5.5 MB/s | 8.6 MB 00:01
(5/15): fuse-common-3.10.2-9.el9.x86_64.rpm 57 kB/s | 7.3 kB 00:00
(6/15): libslirp-4.4.0-8.el9.x86_64.rpm 207 kB/s | 67 kB 00:00
(7/15): container-selinux-2.237.0-1.el9_6.noarch.rpm 1.0 MB/s | 58 kB 00:00
(8/15): fuse3-libs-3.10.2-9.el9.x86_64.rpm 1.2 MB/s | 91 kB 00:00
(9/15): docker-compose-plugin-2.39.1-1.el9.x86_64.rpm 15 MB/s | 15 MB 00:01
(10/15): fuse3-3.10.2-9.el9.x86_64.rpm 225 kB/s | 53 kB 00:00
(11/15): containerd.io-1.7.27-3.1.el9.x86_64.rpm 8.3 MB/s | 44 MB 00:05
(12/15): slirp4netns-1.3.2-1.el9.x86_64.rpm 41 kB/s | 46 kB 00:01
(13/15): fuse-overlayfs-1.14-1.el9.x86_64.rpm 59 kB/s | 66 kB 00:01
(14/15): selinux-policy-38.1.53-5.el9_6.noarch.rpm 589 kB/s | 44 kB 00:00
(15/15): selinux-policy-targeted-38.1.53-5.el9_6.noarch.rpm 7.3 MB/s | 6.5 MB 00:00
--------------------------------------------------------------------------------------------------------------------------------------------------------------------
Total 16 MB/s | 115 MB 00:07
Docker CE Stable - x86_64 22 kB/s | 1.6 kB 00:00
Importing GPG key 0x621E9F35:
Userid : "Docker Release (CE rpm) <docker@docker.com>"
Fingerprint: 060A 61C5 1B55 8A7F 742B 77AA C52F EB6B 621E 9F35
From : https://download.docker.com/linux/centos/gpg
Is this ok [y/N]: y
Key imported successfully
Running transaction check
Transaction check succeeded.
Running transaction test
Transaction test succeeded.
Running transaction
Running scriptlet: selinux-policy-targeted-38.1.53-5.el9_6.noarch 1/1
Preparing : 1/1
Upgrading : selinux-policy-38.1.53-5.el9_6.noarch 1/17
Running scriptlet: selinux-policy-38.1.53-5.el9_6.noarch 1/17
Running scriptlet: selinux-policy-targeted-38.1.53-5.el9_6.noarch 2/17
Upgrading : selinux-policy-targeted-38.1.53-5.el9_6.noarch 2/17
Running scriptlet: selinux-policy-targeted-38.1.53-5.el9_6.noarch 2/17
Running scriptlet: container-selinux-4:2.237.0-1.el9_6.noarch 3/17
Installing : container-selinux-4:2.237.0-1.el9_6.noarch 3/17
Running scriptlet: container-selinux-4:2.237.0-1.el9_6.noarch 3/17
Installing : fuse3-libs-3.10.2-9.el9.x86_64 4/17
Installing : docker-buildx-plugin-0.26.1-1.el9.x86_64 5/17
Running scriptlet: docker-buildx-plugin-0.26.1-1.el9.x86_64 5/17
Installing : docker-compose-plugin-2.39.1-1.el9.x86_64 6/17
Running scriptlet: docker-compose-plugin-2.39.1-1.el9.x86_64 6/17
Installing : docker-ce-cli-1:28.3.3-1.el9.x86_64 7/17
Running scriptlet: docker-ce-cli-1:28.3.3-1.el9.x86_64 7/17
Installing : containerd.io-1.7.27-3.1.el9.x86_64 8/17
Running scriptlet: containerd.io-1.7.27-3.1.el9.x86_64 8/17
Installing : libslirp-4.4.0-8.el9.x86_64 9/17
Installing : slirp4netns-1.3.2-1.el9.x86_64 10/17
Installing : fuse-common-3.10.2-9.el9.x86_64 11/17
Installing : fuse3-3.10.2-9.el9.x86_64 12/17
Installing : fuse-overlayfs-1.14-1.el9.x86_64 13/17
Running scriptlet: fuse-overlayfs-1.14-1.el9.x86_64 13/17
Installing : docker-ce-rootless-extras-28.3.3-1.el9.x86_64 14/17
Running scriptlet: docker-ce-rootless-extras-28.3.3-1.el9.x86_64 14/17
Installing : docker-ce-3:28.3.3-1.el9.x86_64 15/17
Running scriptlet: docker-ce-3:28.3.3-1.el9.x86_64 15/17
Running scriptlet: selinux-policy-38.1.11-2.el9_2.2.noarch 16/17
Cleanup : selinux-policy-38.1.11-2.el9_2.2.noarch 16/17
Running scriptlet: selinux-policy-38.1.11-2.el9_2.2.noarch 16/17
Cleanup : selinux-policy-targeted-38.1.11-2.el9_2.2.noarch 17/17
Running scriptlet: selinux-policy-targeted-38.1.11-2.el9_2.2.noarch 17/17
Running scriptlet: selinux-policy-targeted-38.1.53-5.el9_6.noarch 17/17
Running scriptlet: container-selinux-4:2.237.0-1.el9_6.noarch
Docker 테스트
- hello-world 이미지를 실행합니다.
[root@sb ~]# sudo docker run hello-world

Hello from Docker!
This message shows that your installation appears to be working correctly.

To generate this message, Docker took the following steps:
 1. The Docker client contacted the Docker daemon.
 2. The Docker daemon pulled the "hello-world" image from the Docker Hub.
    (amd64)
 3. The Docker daemon created a new container from that image which runs the
    executable that produces the output you are currently reading.
 4. The Docker daemon streamed that output to the Docker client, which sent it
    to your terminal.

To try something more ambitious, you can run an Ubuntu container with:
 $ docker run -it ubuntu bash

Share images, automate workflows, and more with a free Docker ID:
 https://hub.docker.com/

For more examples and ideas, visit:
 https://docs.docker.com/get-started/
docker-compose.yml
- 저는 로컬(windows)에 존재하는 docker-compose.yml 파일을 linux server로 옮겨주었습니다.
- 추가로, 볼륨(volume) 설정이 있다면 compose 파일에 맞게 서버 내 디렉토리와 설정 파일, SQL 파일 등도 함께 준비해주셔야 합니다. (이 부분은 생략)
PS C:\Users\admin> scp C:\docker-compose.yml root@192.168.217.190:docker/
root@192.168.217.190's password:
docker-compose.yml                                                                                                                100% 2200     1.1MB/s   00:00
방화벽 설정을 위한 firewall 설치 및 포트 개방
- 설치: sudo dnf install -y firewalld
- 실행: sudo systemctl enable firewalld --now
- 상태 확인: sudo systemctl status firewalld
- 변경사항 적용: sudo firewall-cmd --reload
- 개방된 포트 확인: sudo firewall-cmd --list-ports
- 외부에서 서버로 들어오는(Inbound) 트래픽을 허용할 포트 지정: sudo firewall-cmd --add-port={port_number}
- --permanant: 서버 재부팅 시에도 설정 유지하기 위한 옵션
[root@sb docker]# sudo dnf install -y firewalld
Last metadata expiration check: 0:34:01 ago on Tue Sep  2 05:58:16 2025.
Package firewalld-1.3.4-9.el9_5.noarch is already installed.
Dependencies resolved.
Nothing to do.
Complete!
[root@sb docker]# sudo systemctl enable firewalld --now
[root@sb docker]# sudo systemctl status firewalld
● firewalld.service - firewalld - dynamic firewall daemon
     Loaded: loaded (/usr/lib/systemd/system/firewalld.service; enabled; preset: enabled)
     Active: active (running) since Tue 2025-09-02 06:32:56 UTC; 11s ago
       Docs: man:firewalld(1)
   Main PID: 126067 (firewalld)
      Tasks: 2 (limit: 48688)
     Memory: 25.1M
        CPU: 2.939s
     CGroup: /system.slice/firewalld.service
             └─126067 /usr/bin/python3 -s /usr/sbin/firewalld --nofork --nopid

Sep 02 06:32:54 sb.kim-test.novalocal systemd[1]: Starting firewalld - dynamic firewall daemon...
Sep 02 06:32:56 sb.kim-test.novalocal systemd[1]: Started firewalld - dynamic firewall daemon.
[root@sb docker]# sudo firewall-cmd --add-port=3306/tcp --add-port=3307/tcp --add-port=9000/tcp \
                  --add-port=9001/tcp --add-port=9002/tcp --add-port=8443/tcp \
                  --add-port=9200/tcp --add-port=9300/tcp --permanent
success
[root@sb docker]# sudo firewall-cmd --reload
success
[root@sb docker]# sudo firewall-cmd --list-ports
3306/tcp 3307/tcp 8443/tcp 9000/tcp 9001/tcp 9002/tcp 9200/tcp 9300/tcp
방화벽 (firewall)
- 특정 유형의 네트워크 유형을 차단하기 위한 장치
- 신뢰할 수 있는 트래픽만 허용하고, 나머지는 차단하기 위한 목적으로 사용됩니다.
- inbound, outbound 규칙을 설정하여 내, 외부 트래픽을 제어할 수 있을 뿐만 아니라, 특정 포트 및 프로토콜을 설정을 지원합니다.
- 리눅스에서 방화벽 설정을 위한 관리 도구로 firewalld를 제공하며, firewall-cmd 명령어를 통해 방화벽 설정을 할 수 있습니다.
firewall-cmd 명령어
--- 포트 개방 및 개방된 포트 차단---
firewall-cmd --permanent --add-port=80/tcp
firewall-cmd --permanent --add-service=http
firewall-cmd --permanent --add-service=https


firewall-cmd --permanent --remove-port=80/tcp
firewall-cmd --permanent --remove-service=http
firewall-cmd --permanent --remove-service=https

--- 특정 IP에 대해 허용 및 정책 삭제 ---
firewall-cmd --permanent --add-source=127.0.0.1
firewall-cmd --permanent --remove-source=127.0.0.1

--- 정책 확인 및 반영 ---
firewall-cmd --reload
firewall-cmd --list-all
<참고 자료>
https://docs.tosspayments.com/resources/glossary/firewall
방화벽(Firewall) | 토스페이먼츠 개발자센터
방화벽은 특정 유형의 네트워크 트래픽을 차단하는 장치를 말해요. 신뢰할 수 있는 네트워크 트래픽은 허용하고, 신뢰할 수 없는 악성 트래픽을 막는 것이죠.
docs.tosspayments.com
https://eveningdev.tistory.com/242
[NCLOUD] Rocky Linux 8.10에서 Docker 설치하는 방법 알아보기
안녕하세요. 이번 시간에는 NCLOUD 서버 중에서 Rocky Linux 8.10에서 Docker를 설치하는 방법을 알아보겠습니다.추가적인 확인을 위해 Rocky Linux 8.8과 9.4 버전도 준비하였으니 참고해주시면 됩니다.0.
eveningdev.tistory.com
https://jbground.tistory.com/90
[Linux] EC2 Ubuntu 리눅스 Docker 설치 방법 및 도커 주요 명령어
1. Docker 설치 방법1.1. apt 업데이트 및 필수 패키지 설치#apt 업데이트sudo apt-get update#필수 패키지 설치sudo apt-get install -y apt-transport-https ca-certificates curl gnupg 1.2. 공개키 다운로드 및 저장소 등록#공
jbground.tistory.com
https://www.fedoralinux.or.kr/forums/topic/119641
페도라 리눅스 방화벽 firewalld 설정 제어하기 | 페도라 한국 사용자 모임
안녕하세요 운영자 태랑 입니다. 이번글은 방화벽 프로그램인 firewalld 에 대해서 간략하게 확인 해보도록 하겠습니다. firewalld는 리눅스에서 방화벽을 설정하고 관리하는 도구입니다. firewalld는 i
www.fedoralinux.or.kr
'DevOps > Docker' 카테고리의 다른 글
| [Docker] Dockerfile을 이용해 SpringApplication 빌드 및 실행 (0) | 2023.09.14 |
|---|---|
| [Docker] Docker-Compose를 사용하여 Springboot와 ELK stack 연동 (0) | 2023.09.04 |
| [Docker] Docker-Compose를 사용하여 Springboot, Mysql 연동 (0) | 2023.08.31 |
| [Docker] Docker, Docker-Compose, Dockerfile (0) | 2023.08.31 |
| [Docker] Container vs VM (0) | 2023.08.31 |